RELOCATION GUIDE Action Plan
You can assume that any of the links to products or services provided in this lesson may earn me a commission. Thank you.
Strategy
Relocation Package
3D Property Presentation
Cameras
Online OPEN HOUSE
Business Improvement:
Create a Relocation Guide using Microsoft Word
Creating a Walk through Video
Online Tools
YouTube Channel
EyeSpy360.com & Matterport
Descript.com
Designrr.io
Introduction
The Relocation Guide is your very own creation. There isn't anything harder or more time consuming than creating anything for the first time. Don't get discouraged, start with the cover and then add a page about the largest community in your area, then add a page about the different neighborhoods, then add information with links to the different schools. Or choose recreational areas, golf courses, etc. If you get stuck just go to Google and search for things to do in your area to get some ideas.
When you search for something in Google there will be an additional section that similar things that people searched for. That can be a gold mine into what people are thinking when they are searching that area. Write those down and add that information. Those are great ideas to videos, or blogs. You want to get into the customer's head, Google helps you do that!
Once you have created even part of the information you can add that information to your website. Add it as a page for your Relocation Guide, it may need to be updated occasionally, but the basic work is done and you will have something that you can use repeatedly. Valuable information is always appreciated, and it truly is what no one else is doing.
Outline for Creating Relocation Guide
Step One : Content Planning
- Identify Key Information:
- Determine the essential information to include, such as local amenities, housing options, schools, healthcare facilities, job opportunities, and recreational activities. What do you want people moving into your part of the state to know?
- If you don't know, then Google "What to see and do in ______________ See what comes up. Remember to respect copyright laws.
- If you like, you could use ChatGPT and ask the same question, and then also use all of the information on where that content came from. Doing it that way is like writing a book, giving credit to those that provided you the information.
- In real estate you are going up against the very largest sites providing information on neighborhoods. They hire researchers, so they don't know as much as you do about the neighborhoods, and they don't know the people. You build your information with people's names, mention businesses and places with stories about them, and you will create raving fans. You're the expert, and that is exactly what you want to convey to the people that receive your Relocation Guide.
- Organize Information:
- First thing I do when I start a new project like this is create a folder on my desktop. I save the pictures I'm going to use, all of my document pages, everything that has anything to do with this project. Why? Because your computer will save your pictures to Pictures, your Pages to Documents, etc....your computer thinks it's helping. But when you see an error you need to correct, or find a different picture you would like to use everything is scattered and you have to hunt it down. Ever had a great idea and by the time you got to where you needed to be you forgot the great idea? That's why.
- Categorize your content to make it easy for readers to navigate. For example, create sections for Communities, Housing, Recreation, Schools, Medical Facilities, etc. These can be folders inside the project folder on your desktop.
- If your Relocation Guide gets to be a large document, then you will want to create a Table of Contents. Which means numbering your pages.
Step Two : Content Creation
- Write Content:
- Don't worry about sounding like an authority. Write like you talk. You don't think you can write, but you can. You talk all the time. Just type out what you would say. Pretty quick your page will reflect you, and that is where you will find those people that relate to you.
- Include important details about each category, providing helpful tips and recommendations.
- The more personal you can create it using stories, the better.
- Incorporate Visuals:
- Add relevant images, maps, and infographics to enhance the guide's visual appeal. My area is so rural, that we have place marker signs just so you can tell what part of the county you're in. If your area has famous landmarks, include those. People love maps, and links to interactive maps is easy to do.
Step Three : Document Creation
- Use a Word Processor or Design Tool:
- You can use Microsoft Word, I used Microsoft Word to create my pages. Click here to subscribe to Microsoft 365. I use the Business Basic for $6.00 a month
- You could use Google Docs, or a graphic design tool like Adobe InDesign, or Designrr to create your document.
I used Microsoft Word in this lesson. - There is a free open source you can download called Apache OpenOffice
- Page Layout:
- Set up the page layout for a standard letter-sized document or choose a size that fits your design preferences.
- Fonts and Styles:
- Use readable fonts and consistent styles throughout the document for a professional look. Use black ink or one that contrasts well. Don't use grey tones or blue on a white background. There are a lot of us out here that don't see well enough to read the lighter tones.
Step Four : Save as PDF
- Save as PDF:
- Once your document is ready, save it as a PDF. Most word processors and design tools have an option to save or export as PDF. If you have created individual pdf pages then you will want to merge them into a single file. There are many free websites to accomplish that.
Step Five : Website Integration
- Upload to Your Website:
- If you have a content management system (CMS) like WordPress, navigate to the page where you want to add the download link and upload the PDF to your Media Library. You can Google how to upload a pdf file to your website.
- Create a Download Link:
- Create a hyperlink to the PDF file on your website. Most CMS platforms allow you to add links easily. Users can click the link to download the relocation guide. This link will be used in all of your marketing for folks to download your Relocation Guide.
Step Six : Email Distribution
- Attach PDF to Emails:
- When sending emails to interested individuals, attach the PDF file directly or include a link to download it from your website. If your Relocation Guide is not too big, you will be able to email it out, otherwise you will provide them a short message with a link.
- Rename it if you need to so that it says what it is. Because that is what your customer is going to see attached in the email.
Step Seven : Test Download and Links:
-
- Ensure that the download link on your website works properly, and recipients can successfully download the guide from the link provided in your emails.
- Update as Needed:
- Periodically update the relocation guide to keep information current. Upload the updated version to your website and inform subscribers or interested parties via email. Sometimes people will put a year on their Relocation Guide, but I think that limits the number of downloads you will receive.
You can create a Relocation Guide as simple or as big as you want it to be. I've done 8 pages, and one that is 42 pages. You can start off with a simple one, the idea is that it is something that people will download and read through, and it has your branding all over it.
You can also upload all the information to your website. The most important parts and are going to be the neighborhoods. Homes.com, Zillow, all of the largest websites are spending billions to bring information to the consumers on neighborhoods. They can not do it better than you can! They are hiring researchers to pull as much information as they can find so they can copyright what they have accumulated. You need to do the same, copyright your material so they can't use it. In this world that now includes AI, copyright is more important than it has ever been. Whenever you write anything, under the title or the header put "by Your Name" that gives you credit for everything that follows.
Relocation Guide Samples to look at
Microsoft Word Tutorial
This tutorial will teach you Headers, Footers, Text, Pictures. 13 minutes
Start with a Document
Use Microsoft Word to create my pages. Click here to subscribe to Microsoft 365. I use the Business Basic for $6.00 a month.
Once you have all the pages created you export them as .pdfs, and then merge them into a single document. With a beautiful Cover Page, you can call it an E-Book. With a program like Designrr.io you can create an actual EReader or Kindle e-Book that is device sensitive, or create a Flipbook, even embed video.
I'm going to teach you a simple document to a pdf to start. Once you've mastered this, think of all the other things that you could do with this. Create an eBook Buyer's Presentation, Seller's Listing Presentation.....
I have uploaded some of my Word pages so that you can see the text boxes, and how they are used in combination to create what you see on the finished page.
3- Douglas County History 10-18
Start with a Text Box
I do everything in Word with text boxes. I put text in text boxes, even the background color for the page is created in a text box. It is the simplest way to have complete control over everything on the page you are creating. Not just the position on the page, but also think in layers.
You can create a background for the page, then stack text and pictures on top of that background. Even the pictures can be manipulated in layers. You will see in my flipbook, on the back inside cover, a background picture with text, a map, and a framed picture of a leaping bass. Layer on layer on layer.
So let's start with a blank Word page and add a background...
Background Color
Open Word, File, Open, New Blank Page.
When the blank page opens click on Layout, Letter, Margins, Normal.
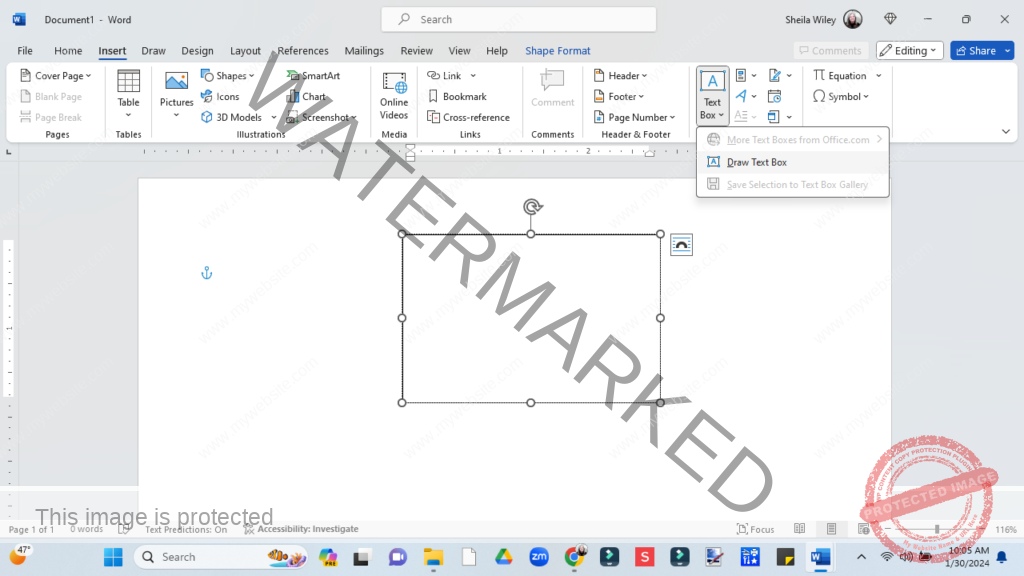
To add a text box, click Insert, Text Box, Draw Text Box. Click your cursor to the page and keeping the left mouse button held down drag your text box open.
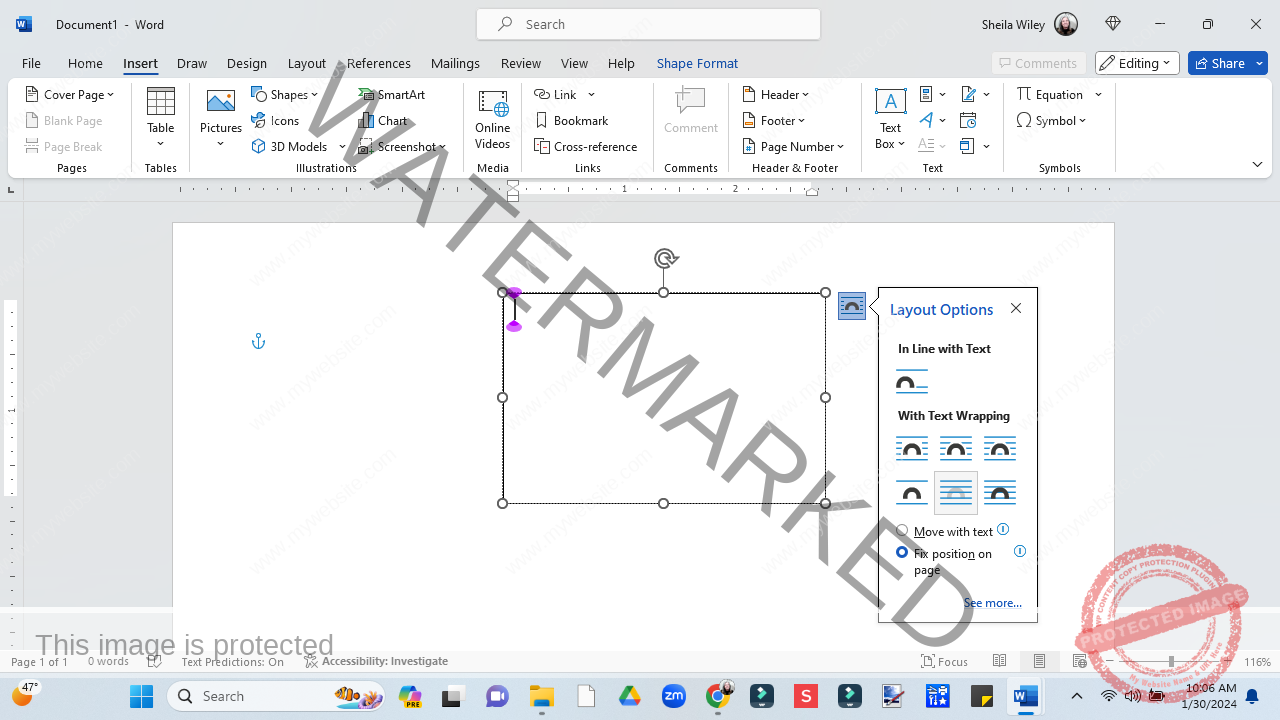
Open the Layout Options Box next to the Text Box you just created. Click on Under the Text and Fix positioning on the page. The choices will come up when you move your cursor over them. Close the Layout Options Box.
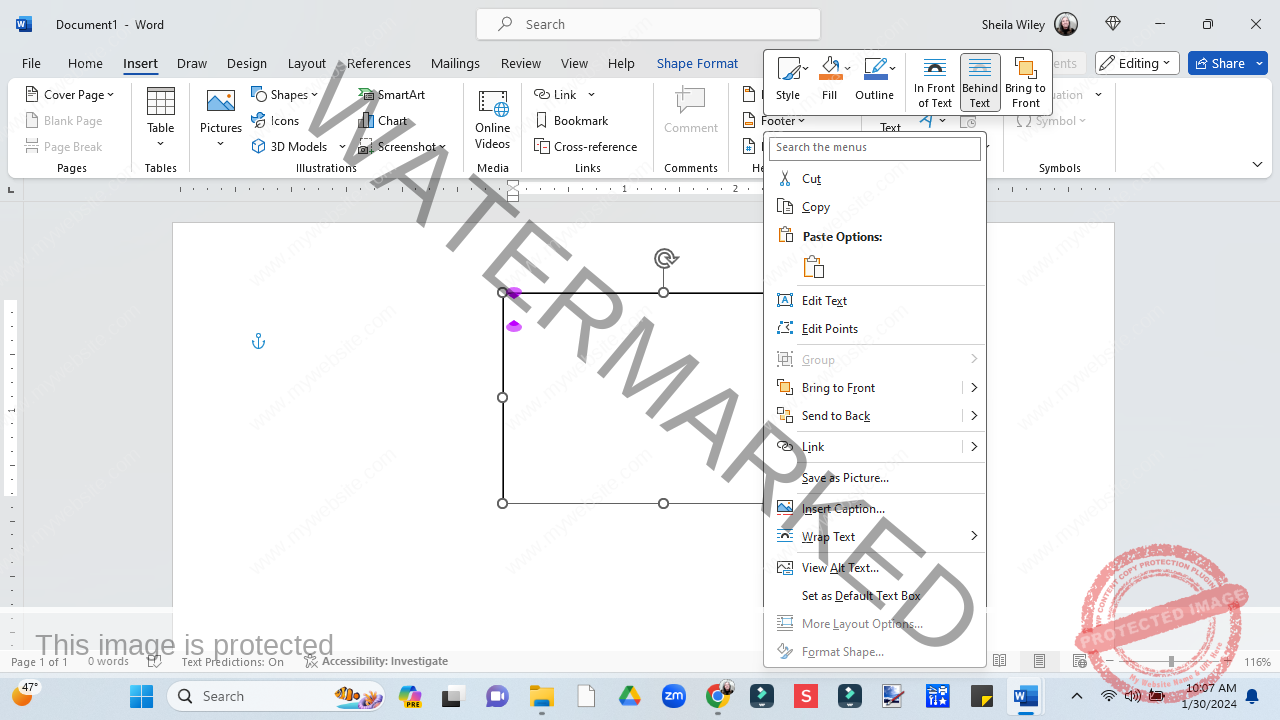
Move your cursor to the top of the Text Box and right click Two windows will open. You want the one at the very top. Click on Fill, and choose a color for your page background. Mine is the lightest Gold color. But take your time and look at what is available, you can also access textures in the Fill Window.
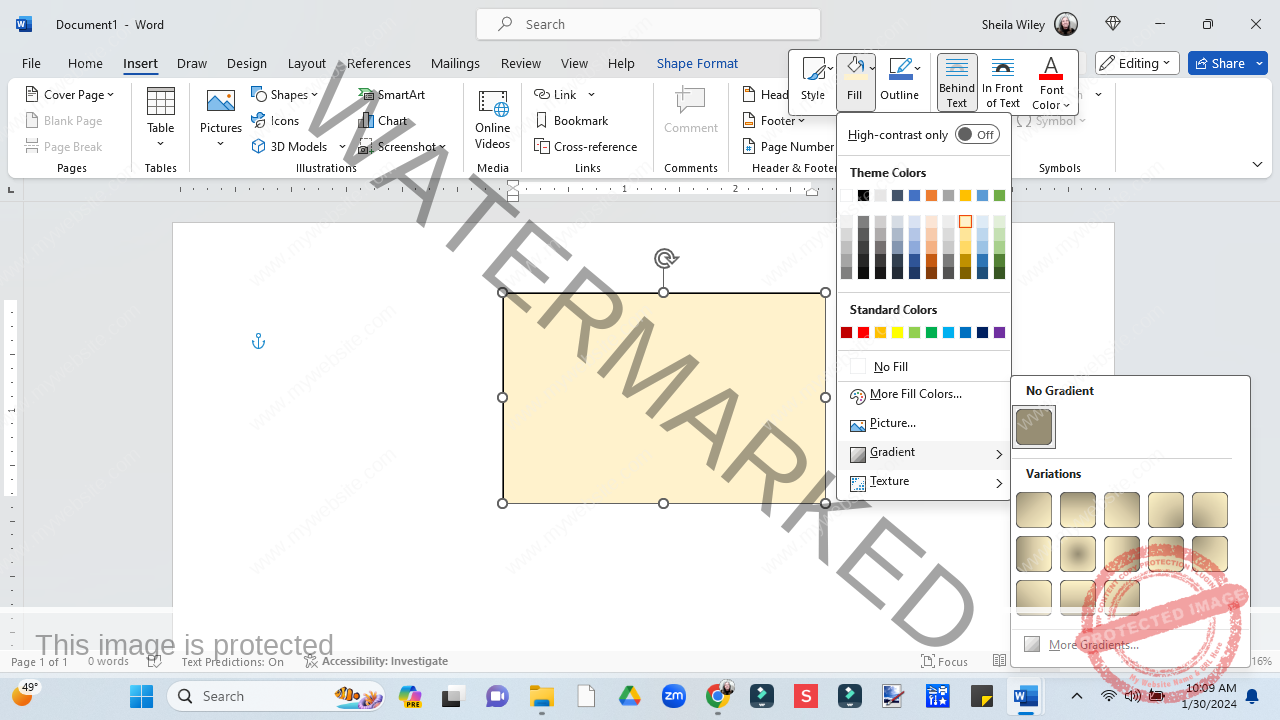
If you like you can also add a Gradient shadow. I like the way it looks, so I added it to my page.
Move your cursor towards the top of your colored text box until the pickup tool appears. While holding down the left mouse button, move your text box to where you want to start. I didn't want all of the Gradient to show on my page, so I moved it past the left hand edge of the text box where I wanted it to start. Lift your finger off your mouse and the gradient shadow will stay where you set it down.
It has now become part of the color background.
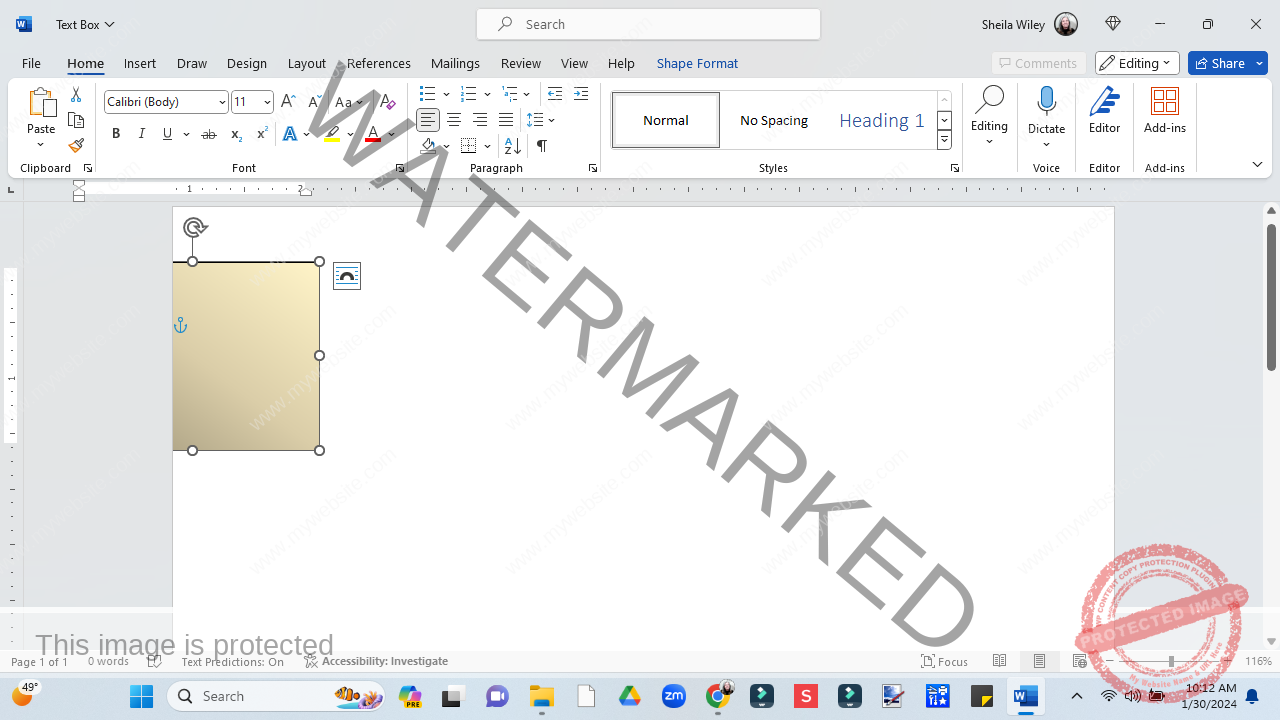
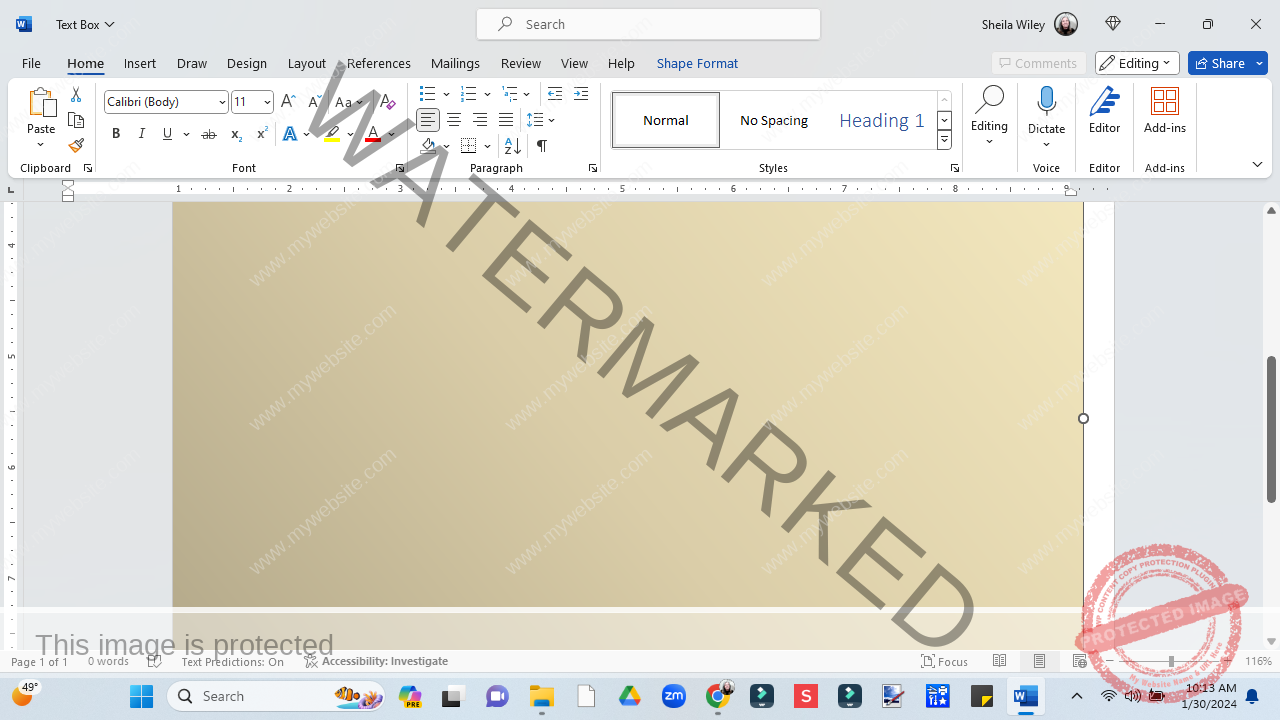
I have grabbed the bubble in the outside line and pulled the text box down the page, so the line is just past the edge of the page. When I pulled the right hand edge past that page edge I will have a colored page background to use. I can save this as a Template simply by naming it Gold Page Background Template.
You won't be able to grab this text box and move it after you've pulled those lines past the page edge unless you hit the undo button enough times to see it again.
For those of you that have some experience with Word, you may be wondering why color the page with a text box, when Word gives you the option of coloring the page. The reason is because when you save the page as a pdf, the color will cover the entire page. If you use the page color option, the margins will default to white.
Background Picture
You can make your page background a picture like I did for my cover. But with a photo, when you place it on the page you will be able to stretch it as far as you want past the page edge, and you can always use the grabber tool to pick up the picture and change it's position on the page. I've taken very large pictures and pulled them across the page to enlarge the picture and capture just that part of it that I wanted to use as a page background.
The pictures you use need to have a resolution of 300 pixels per inch. Smaller pictures will blurr and pixilate when you try to make them larger.
Look for pictures that start out about 1200 pixels wide. Search the internet for Wallpaper HD pictures. That is where I find a lot of my landscape pictures.
If you have pictures of your own, you can change the resolution with a free software program call Paint by Microsoft. https://www.getpaint.net/download.html#download
MS PAINT
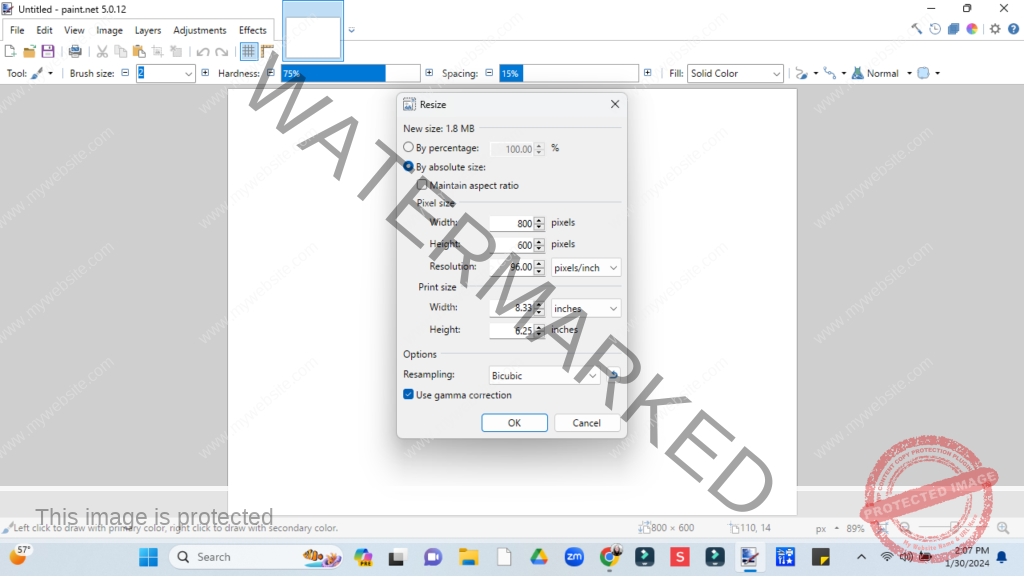
Paint.net https://www.getpaint.net/download.html#download
Open Paint.net click on file and find the picture you want to change the resolution for.
Click Image, Resize, Check mark Maintain Ratio. By doing this you can also change the size of the picture if you need to.
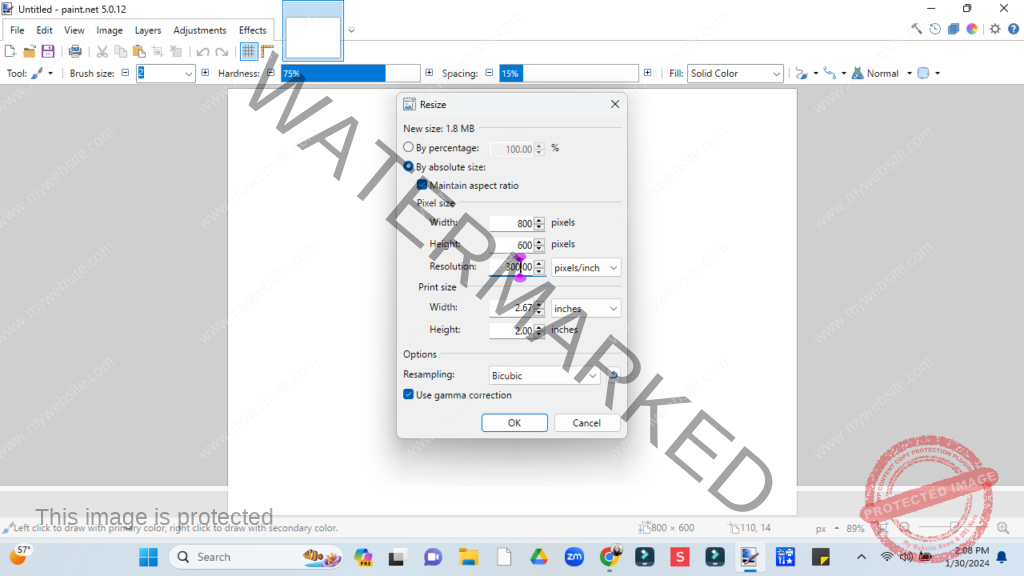
Change the resolution to 300.00 px.
Most pictures off the internet are going to be 96.00, some will be as low as 72.00.
Play with the numbers and see what you can do. You can usually go a bit larger with the picture without noticing a difference. But try to go too large and it won't work.
You can try a couple of things in Paint to improve your picture.
Try clicking on Adjustments, Auto-Level. That is an easy way to get the yellow out of indoor pictures.
Try clicking on Effects, Photo, Sharpen. That is an easy way to make a picture appear to have clearer detail.
Anything you try and easily be undone by using the Undo Button as many steps as you need to go back.
Paint is a program well worth the time it takes to learn how to use. I used to spend hundreds of dollars of software programs like Adobe, but I don't need graphic design, I just need the basics, and Paint does a great job.
Add Content - Add Links!
Once you have set your background create a new text box on top of the background and start typing. You can change the size of the text, the font, the color, everything is in your control.
You can create Headings and play with the fonts, and make the Headings a different font than the content.
You mention a city you can add a link to more information about that city by highlighting the word, hit the link icon and add the link url address to make it a live link.
Go to the internet and find the page you want to link to, copy the url, by placing your cursor at the beginning, click the left button on your mouse and pullthe mouse across the entire url. Move your cursor so that it is touching the highlighted line of text, right click your mouse and hit copy. This puts that url information onto your computers copy board.
Go to your document, put your cursor at the beginning of the word you want the link to go to. Holding the left mouse button down pull across the word so that it is highlighted. Click on Insert, Click on Link and a window will open. Add the url you copied in the window at the bottom, by clicking the right button on your mouse and hitting paste. The url that you copied should now show in that box. Hit save. You now have a live link. Be sure and test that works.
I use links to everything I mention. Golf Courses, Schools, Public Pool, Softball Fields, City Hall.....it's endless! Don't forget links to Facebook sites. A lot of community places that don't have a website, will have a Facebook page.
The more information that you can pack into your Relocation Guide the more valuable it is going to be to your potential buyer. They won't think of using anyone else. You've created a raving fan!
Creating A Hyper Link
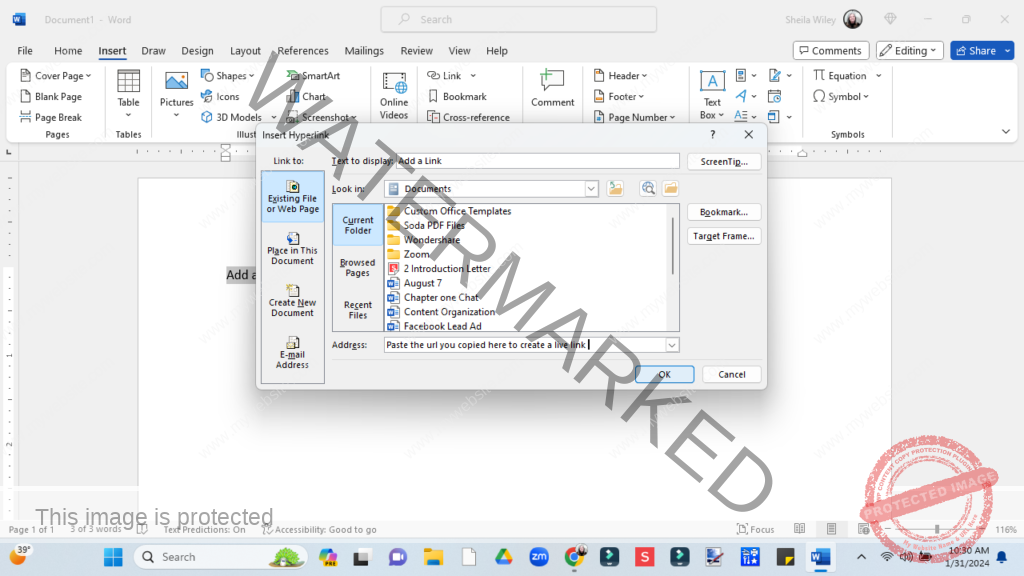
You can create a hyper link in the document that will remain a hyper link when the document is saved as a pdf.
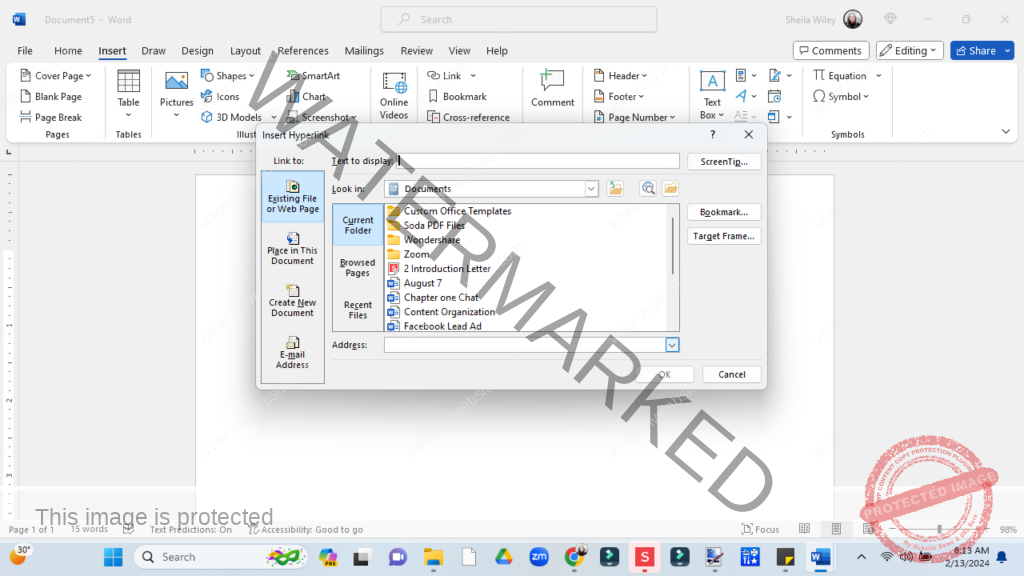
There are two ways to create a hyper link, highlight the word, web address, or telephone number you want to make a hyper link, or have the link box create both the text, or number and make it a live link.
If you type it out first, starting at the left hold the left button down and drag your mouse to highlight that text or number you want to make into a hyper link.
Types of hyper links:
URL links to a website, and this is the most common one used and when the window open to save a hyper link it will assume it is a website. But you can also create hyper links to emails and telephone numbers. To have the link box create what you want to add to the document open the link box and use Text to Display at the top to show what it will look like on the page, and create the link in the bottom box Address, and hit save.
Website https://
When the window opens and it is an email address, add in the bottom box mailto:
When you paste in a telephone number it will change to tele:
Making a Book from Pages
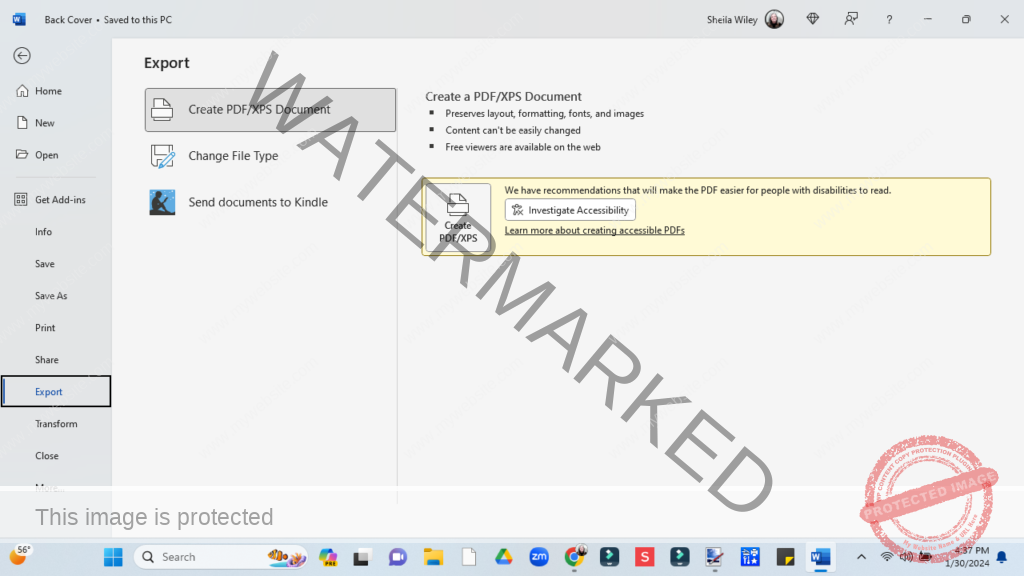
Once you have created your pages, you will save them as pdfs. Then you will take the pdfs and merge them into a single document and finally have your completed Relocation Guide.
I put all of Word document pages in a folder on my desktop. To get them in the order that I want I put a number in front of the page file name. For example put 1 in front of Cover, and so on. That way when export them into pdfs they will be in the page order that I want the book to be in.
Open your Word page and click file, and export. Create pdf.
Go to https://www.adobe.com/acrobat/online/merge-pdf.html and upload all of your pages. Download the finished product.
If you want to make it into a flipbook there are some websites that are free, and some that offer other features. I personally use Designrr.io. They are also the program I use to create Kindle eBooks. The little flipbook below is one that I did the first time in 2013 I think??
Sharing Your Relocation Guide
If your Relocation Guide is a file size that you can email, then you can simply attach it to any outgoing email. What size is too big? Well, it varies, and it is also important to consider the people who are receiving the email. I opt to send them a link, that way they can decide.
If your Relocation Guide is too large to email then there are several ways that you can make it accessible. Upload it to a cloud server, compress the file to zip file, or upload it to your website as a downloadable file that you can email a link to.
Your Relocation Guide does not necessarily have to be shown on your website as a download, but I would recommend it. The more people that have access to your Relocation Guide the more raving fans. Don't worry about other agents, the only thing they are going to be is intimidated.
You can ask the person or department to help you get your Relocation Guide uploaded to your website. You might also ask them about adding a simple form where they have to give you their name and email address to receive the Relocation Guide. But beware, people don't like giving you their information first, so don't abuse it! I had to fill out the form to get one of the samples I gave you and the agent immediately signed me up for his newsletter, which I didn't ask for, and hit me with a dozen questions. Let the Relocation Guide do the work. They have all your information, trust that they will reach out.
Cameras
Oh Boy! This one is going to be fun! Because we are going to cover everything that captures an image. Your Cellphone Camera, a Camera, a Video Camera, a 360 Camera, a 360 Video Camera, a Drone Camera.
Camera technology is so good, even in our smartphones, you don't need to buy expensive equipment and try to learn how to use it. Use what you have to start. Buy better when you can afford it, or let everyone know what you want for your birthday!
I will also provide some information on cameras that are available on Amazon.
The drawback to using your cell phone is that there is no flash. Using any camera set on HDR pictures, Panoramic or wide screen, with the flash on will give you much better pictures.
I am not a camera expert, you want to know how to turn your cellphone into a better camera? Google it. There is so much information and equipment out there, so many choices! I swear, you could purchase a pretty nice camera for all the gadgets you can buy for your smartphone.
Cellphone Camera
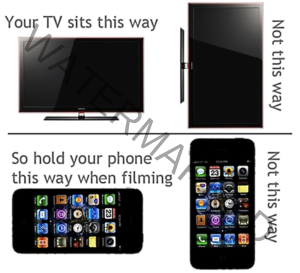
This is an easy way to remember how to take pictures with your cellphone.
Your cellphone is going to give a decent panoramic photo.
Outside early morning is better than late in the day. Overcast works well for outdoor pictures, or noon when the sun is very high in the sky, because there are less shadows.
But dreary grey skies are horrible for showing off the front of a home. On those days, I will take all the indoor photos, and come back when the sun is shining for the outdoor pictures.
Then there are always those tiny powder rooms that you can never get a good photo of. For those, you have to hold your phone to catch the vanity and the mirror. There just isn't any other way.
This will not apply when you are using your smart phone to take 360 degree pictures for 3D tours.

Google "How do I get the best picture out of my (Put in make and model) cellphone?
HD vs HDR Camera
Most of the newer cameras have the HDR capability. The old HD cameras will be obsolete and we won't even think about it anymore. This is just a short lesson in the way the two cameras create a picture so you are aware that there is a difference.
Below is the same room taken at the same time with two different cameras.

This picture was taken with an HDR camera.
A HDR camera actually takes seven images at different light levels. Takes the best balance of the light in each of those shots stacking them together to give you one image that is much closer to what the human eye sees. You can even see what is outside the window.
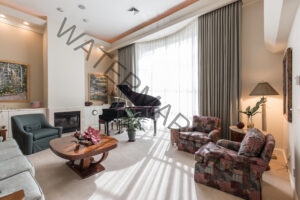
This picture was taken with a camera that produces a HD picture.
It caught the glare through the window, and the shadows across the floor.
So much glare you can't see outside.
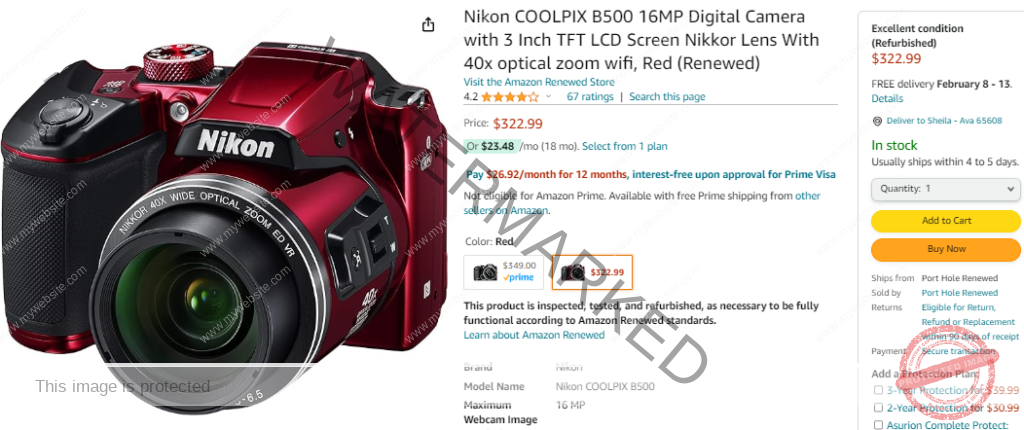
I have a very nice Cannon DSLR Camera that I barely know how to use. I find myself relying on my old Cool Pix camera. I take really good care of my Cannon, with a padded case to carry it in. My Cool Pix ends up knocking around the bottom of my travel bag, or the floorboards of my car. I also like that I can use the Cool Pix for video. I bought it refurbished. Refurbished or Open Box is a great way to get the same product and not pay full price for it. I love a bargain!
I love gadgets, so I have accumulated a lot of them that capture images. I bought a harness for my largest drone that will carry one of my 360 cameras UP! I have another one in a waterproof case attached to fishing line so I can take pictures of what is just below the water's surface. So cool! Okay, I digress.....
If you can, take your own pictures. Take pictures of your local parks, recreational areas, whatever you are putting into your Relocation Guide. You will give your customers a unique picture of your area by not using pictures that you find on the internet.
3D Property Presentation
3D Pictures for your Relocation Guide!
If I were starting today, I would purchase an iPhone with and the Matterport equipment bundle that offers the Axis and Tripod with carrying bag bundle for $89.00. Your iPhone takes better pictures than most the 360 cameras, and if you have the Axis and using the tripod, your pictures are always going to be at eye level and sharp.
You need a smart phone that has the LiDAR scanner to get measurements. If you're going to buy a new phone getting one with the LiDAR scanner means you can also take 360 pictures that will give you exactly measurements of a room, and everything in it! Perfect for 3D Tours for homes.
Because the 3D pictures are kept on the server that converts them, you will always use links in your Relocation Guide. But because it is a digital document you can put a picture on the page that is linked.
3D Tour Companies
Matterport (https://matterport.com) and EyeSpy360 (https://eyespy360.com) are two companies that create 3D tours using your 360 pictures.
Matterport offers a starter bundle that provides the Axis and a tripod with carrying bag. You use the Axis with your iPhone and free app to create your 360 pictures. They also have a very reasonable monthly subscription. If I were starting new, this is the one that I would go with.
EyeSpy360 offers 3D Tours at a per tour cost. They also have the capability of adding on things like drone video, street maps.
Adding 3D pictures indoors and outdoors to your Relocation Guide is something that is not being done.
Can you imagine take a 3D picture at the local golf course, or the town square! Fabulous!
Building a Relocation Packet with RPR
LiRelocation buyers present unique challenges for REALTORS® all of skill and experience levels. RPR can help you meet and exceed those client needs with an array of data, tools and reports that are perfectly fit for the task.
This Learning Series of videos shows you how to use RPR to determine relocation buyer needs, how to use RPR Maps to determine time and distance commutes, and how RPR Neighborhood reports can give out town buyers a feel for the areas they’re moving into.
Link: https://blog.narrpr.com/learn/building-a-relocation-packet-with-rpr/
That is all I have for this Relocation Guide!
I look forward to seeing you next month with the SELLERS REPRESENTATION PRESENTATION.
Until then. All the best success...
Real Estate Agents Network Course Online
- The full Residential Real Estate Agents Network course includes all of the Action Plans. $49.00/Monthly subscription. Cancel anytime. Further details on the website
- To see the Table of Contents click here https://realestateagents.network/table-of-contents/
-
REAL ESTATE
- CONTINUING EDUCATION consists of the courses required for retaining your real estate license. We offer state-specific courses and engaging electives that follow current trends and issues in the industry.
- PRE-LICENSING is the regulatory education required by each state’s real estate commission for getting your license and working in the real estate industry. Our interactive online courses make it easy while preparing you for your career.
- MILITARY VETERANS DISCOUNT for Pre-Licensing Course!
- EXAM PREP EDGE allows you to take an initial assessment and receive feedback on the topics you’ve mastered and the ones you need to focus on. Once you do that, you'll study lessons by topic and improve your score with our real-time dashboards while taking unlimited simulated practice exams to fully prepare you for your state exam.
- UPGRADE YOUR LICENSE Gain confidence and recognition with an upgrade from Salesperson to Broker license.
-
MORTGAGE
-
HOME INSPECTION LICENSING
- HOME INSPECTION LICENSING
- Our innovative home inspection training will set you up for success through industry-leading education.
- Whether you’re interested in becoming a home inspector, new to this purpose-driven career, or a veteran in the industry, American Home Inspection Training (AHIT) has what you need no matter where you are in your career.
- AHIT has you covered with engaging training, industry expertise from instructors, supplemental career resources, and convenient online courses to help you get your home inspector license.